timdoug's tidbits
2025-11-20
unpkg 5.0It's released! Grab that native Swift reimplemention while it's hot.
2024-09-17
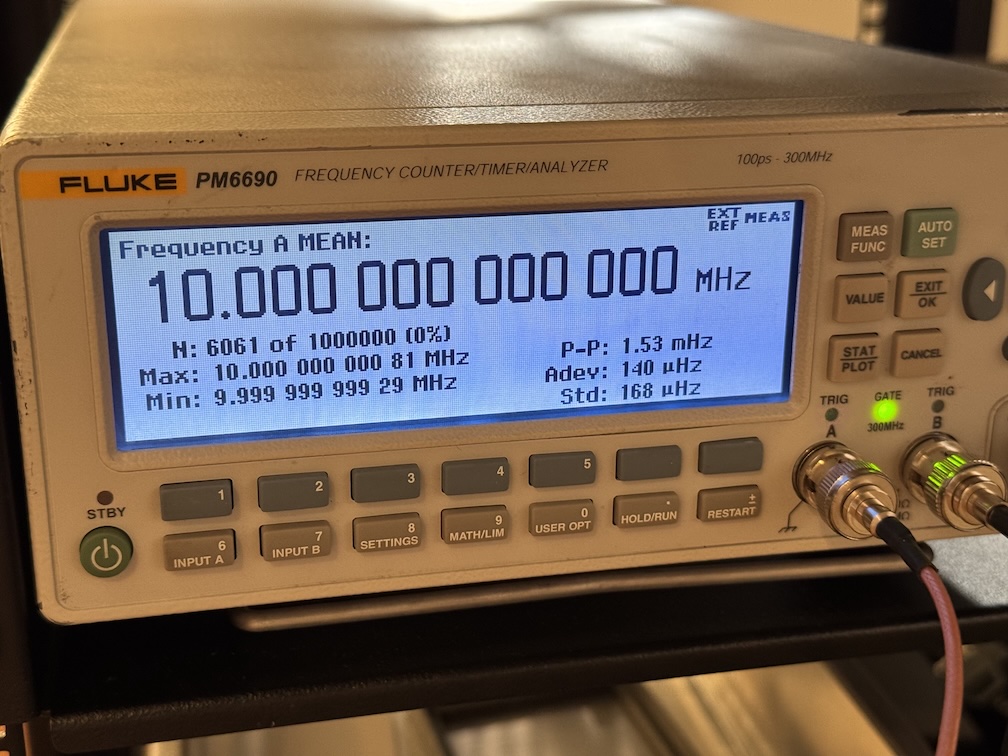
I found the zeros
An SA.22c with manual DDS tuning referenced against an X72 firmware disciplined to a ZED-F9T L1/L2, 101 minute run.
2024-01-15
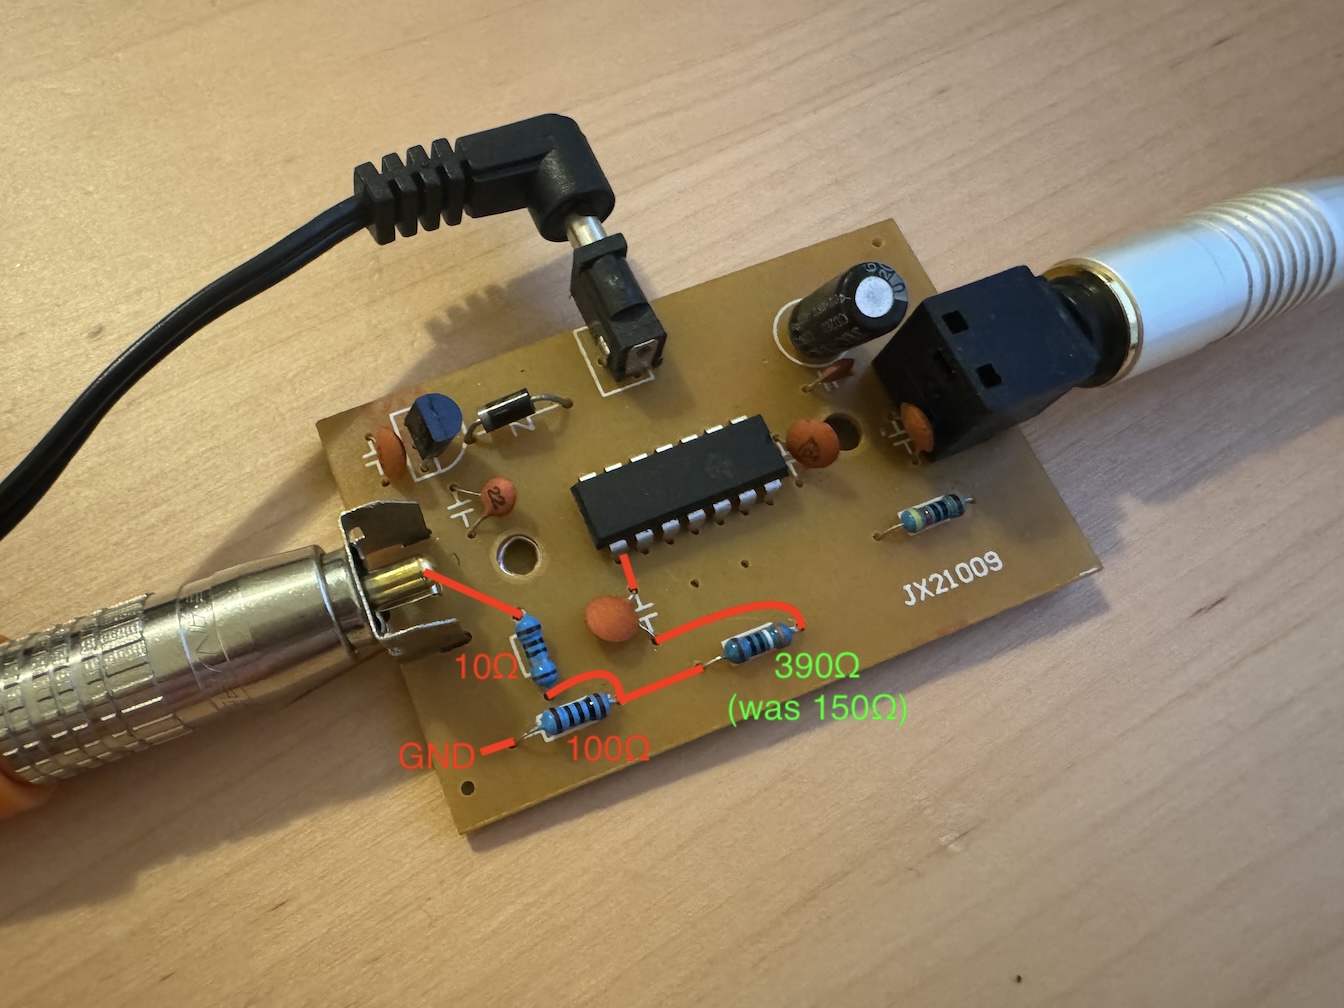
Fixing S/PDIF output levels
The Monoprice S/PDIF TOSLINK to RCA coax adapter is a handy device, but its output is pretty hot -- my oscilliscope reads a bit more than 1V pp into 75Ω termination, about twice what the specification describes.
After the 100nF cap on the 74HC04's output was a 150Ω resistor; I replaced it with a 390Ω one, now it's within spec at ~480mV pp. (I also lifted a pad, can't see the bodge on the other side though!)
2023-03-21
I am now a Mastodon2023-02-25
Compile QEMU on macOS without tons of dependencies, M2 / Ventura editionA gentle update to the 2021 documentation.
$ export QEMU_INSTALL=/path/to/qemu/install
$ brew install pkg-config pixman pcre
$ python3 -m venv qemu_install_venv
$ source qemu_install_venv/bin/activate
(qemu_install_venv) $ pip install --upgrade pip setuptools wheel
(qemu_install_venv) $ pip install ninja meson
(qemu_install_venv) $ curl -LO https://download.gnome.org/sources/glib/2.74/glib-2.74.6.tar.xz
(qemu_install_venv) $ tar xf glib-2.74.6.tar.xz && cd glib-2.74.6
(qemu_install_venv) $ meson --prefix=${QEMU_INSTALL} _build
(qemu_install_venv) $ ninja -C _build
(qemu_install_venv) $ ninja -C _build install
(qemu_install_venv) $ cd .. && curl -LO https://download.qemu.org/qemu-7.2.0.tar.xz
(qemu_install_venv) $ tar xf qemu-7.2.0.tar.xz && cd qemu-7.2.0
(qemu_install_venv) $ PKG_CONFIG_PATH=${QEMU_INSTALL}/lib/pkgconfig/ ./configure --enable-hvf --enable-cocoa --target-list=x86_64-softmmu --prefix=${QEMU_INSTALL}
(qemu_install_venv) $ PKG_CONFIG_PATH=${QEMU_INSTALL}/lib/pkgconfig/ make install
Ahh, much better:
$ otool -L ${QEMU_INSTALL}/bin/qemu-system-x86_64 | grep -vE '^\W+(/usr/lib/|/System/Library/)'
qemu-system-x86_64:
	${QEMU_INSTALL}/lib/libgio-2.0.0.dylib (compatibility version 7401.0.0, current version 7401.6.0)
	${QEMU_INSTALL}/lib/libglib-2.0.0.dylib (compatibility version 7401.0.0, current version 7401.6.0)
	${QEMU_INSTALL}/lib/libgmodule-2.0.0.dylib (compatibility version 7401.0.0, current version 7401.6.0)
	${QEMU_INSTALL}/lib/libgobject-2.0.0.dylib (compatibility version 7401.0.0, current version 7401.6.0)
	/opt/homebrew/opt/libpng/lib/libpng16.16.dylib (compatibility version 56.0.0, current version 56.0.0)
	/opt/homebrew/opt/libusb/lib/libusb-1.0.0.dylib (compatibility version 4.0.0, current version 4.0.0)
	/opt/homebrew/opt/pixman/lib/libpixman-1.0.dylib (compatibility version 43.0.0, current version 43.2.0)
	/opt/homebrew/opt/sdl2/lib/libSDL2-2.0.0.dylib (compatibility version 2601.0.0, current version 2601.3.0)
$
2022-07-14
Use a CH9200 USB Ethernet adapter on macOS MontereyRecently I had an immediate need for hardwired network connectivity on my M1 Air, and could only secure a QinHeng CH9200 dongle that doesn't have macOS drivers. It's a USB 1.1 "full-speed" device, i.e., 12 Mbps, so decidedly archaic bandwidth, but still plenty for video conferencing, and, critically, low and consistent latency vs. 2.4 GHz Wi-Fi that drops when someone starts a microwave nearby. (Editors of The New Yorker: let me know if that is a sufficient comma count thx.)
Luckily mainline Linux has supported it since 2015, so we can virtualize Debian with QEMU and use USB passthru to establish connectivity. Modern macOS no longer supports TAP devices, so we can't bridge the virtualized network to the Mac, but we can (ab)use userland SLIRP and WireGuard to get packets flowing.
First build QEMU — I used version 7.0.0 — with the aarch64-softmmu target (s/aarch64/amd64/ if an Intel Mac) and create a disk image, then grab the Debian installer netboot kernel (filename linux) and initrd.gz. Install Debian with the following arguments, attaching the USB dongle accordingly:
qemu-system-aarch64 -nographic -m 1G -machine virt,accel=hvf -cpu host -kernel linux -initrd initrd.gz -append console=ttyAMA0 -hda debian_aarch64.img -device qemu-xhci -device usb-host,vendorid=0x1a86,productid=0xe092
The installer won't set up a bootloader, so when it's complete, nc the installed kernel and initrd to the Mac. After installation, start it up with port 11111 (or whichever) forwarded for WireGuard:
qemu-system-aarch64 -nographic -m 1G -machine virt,accel=hvf -cpu host -kernel vmlinuz -initrd initrd.img -append "console=ttyAMA0 root=/dev/vda1" -hda debian_aarch64.img -device qemu-xhci -device usb-host,vendorid=0x1a86,productid=0xe092 -nic hostfwd=udp::11111-:11111
Upon boot I had to run dhclient enp0s1 to bring up the userland SLIRP interface from which the Mac will connect; twiddling /etc/network/interfaces correctly should obviate this manual step.
Then install and configure WireGuard, ensuring the POSTROUTING interface in the config is correct; mine was of the form enx84**********. You should be all set!
2022-06-03
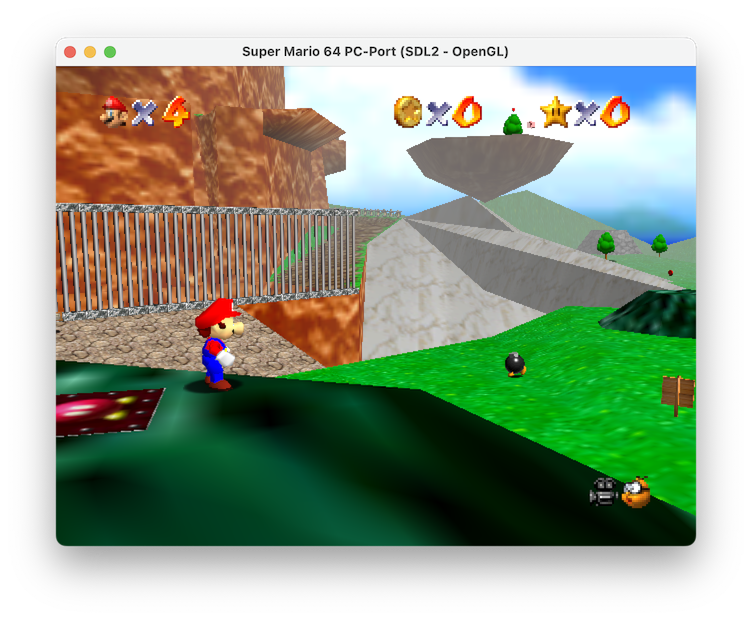
Play Super Mario 64 natively on an M1 MacCheckout https://github.com/sm64-port/sm64-port.git, apply the following super hacky diff, brew install gcc mingw-w64 make pkg-config sdl2 glew libusb, copy the ROM per the docs, and run gmake (for the newer brew version, not the old OS one).
$ file build/us_pc/sm64.us
build/us_pc/sm64.us: Mach-O 64-bit executable arm64
$ otool -L build/us_pc/sm64.us
build/us_pc/sm64.us:
	/opt/homebrew/opt/libusb/lib/libusb-1.0.0.dylib (compatibility version 4.0.0, current version 4.0.0)
	/opt/homebrew/opt/sdl2/lib/libSDL2-2.0.0.dylib (compatibility version 23.0.0, current version 23.0.0)
	/opt/homebrew/opt/glew/lib/libGLEW.2.2.dylib (compatibility version 2.2.0, current version 2.2.0)
	/opt/homebrew/opt/gcc/lib/gcc/11/libstdc++.6.dylib (compatibility version 7.0.0, current version 7.29.0)
	/System/Library/Frameworks/OpenGL.framework/Versions/A/OpenGL (compatibility version 1.0.0, current version 1.0.0)
	/usr/lib/libSystem.B.dylib (compatibility version 1.0.0, current version 1311.100.3)
$
Fascinating how we've gotten here, no?
diff --git a/Makefile b/Makefile
index cfac1e8..cf62291 100644
--- a/Makefile
+++ b/Makefile
@@ -456,10 +456,10 @@ export LANG := C

 else # TARGET_N64

-AS := as
+AS := i686-w64-mingw32-as
 ifneq ($(TARGET_WEB),1)
-  CC := gcc
-  CXX := g++
+  CC := gcc-11
+  CXX := g++-11
 else
   CC := emcc
 endif
@@ -468,8 +468,8 @@ ifeq ($(CXX_FILES),"")
 else
   LD := $(CXX)
 endif
-OBJDUMP := objdump
-OBJCOPY := objcopy
+OBJDUMP := i686-w64-mingw32-objdump
+OBJCOPY := i686-w64-mingw32-objcopy
 PYTHON := python3

 # Platform-specific compiler and linker flags
@@ -479,7 +479,7 @@ ifeq ($(TARGET_WINDOWS),1)
 endif
 ifeq ($(TARGET_LINUX),1)
   PLATFORM_CFLAGS  := -DTARGET_LINUX `pkg-config --cflags libusb-1.0`
-  PLATFORM_LDFLAGS := -lm -lpthread `pkg-config --libs libusb-1.0` -lasound -lpulse -no-pie
+  PLATFORM_LDFLAGS := -lm -lpthread `pkg-config --libs libusb-1.0` -no-pie
 endif
 ifeq ($(TARGET_WEB),1)
   PLATFORM_CFLAGS  := -DTARGET_WEB
@@ -497,8 +497,8 @@ ifeq ($(ENABLE_OPENGL),1)
     GFX_LDFLAGS += $(shell sdl2-config --libs) -lglew32 -lopengl32 -lwinmm -limm32 -lversion -loleaut32 -lsetupapi
   endif
   ifeq ($(TARGET_LINUX),1)
-    GFX_CFLAGS  += $(shell sdl2-config --cflags)
-    GFX_LDFLAGS += -lGL $(shell sdl2-config --libs) -lX11 -lXrandr
+    GFX_CFLAGS  += $(shell sdl2-config --cflags) -I/opt/homebrew/include
+    GFX_LDFLAGS += $(shell sdl2-config --libs) -L/opt/homebrew/lib -lGLEW -framework OpenGL
   endif
   ifeq ($(TARGET_WEB),1)
     GFX_CFLAGS  += -s USE_SDL=2
diff --git a/include/PR/os_libc.h b/include/PR/os_libc.h
index 94111c0..6a43358 100644
--- a/include/PR/os_libc.h
+++ b/include/PR/os_libc.h
@@ -3,8 +3,6 @@

 #include "ultratypes.h"

-// Old deprecated functions from strings.h, replaced by memcpy/memset.
-extern void bcopy(const void *, void *, size_t);
-extern void bzero(void *, size_t);
+#include <string.h>

 #endif /* !_OS_LIBC_H_ */
diff --git a/src/pc/controller/wup.c b/src/pc/controller/wup.c
index 9de54c1..35a37d3 100644
--- a/src/pc/controller/wup.c
+++ b/src/pc/controller/wup.c
@@ -1,4 +1,4 @@
-#if !defined(__MINGW32__) && !defined(__BSD__) && !defined(TARGET_WEB)
+#if !defined(__MINGW32__) && !defined(__BSD__) && !defined(TARGET_WEB) && !defined(__APPLE__)
 // See LICENSE for license

 #define _XOPEN_SOURCE 600
diff --git a/src/pc/gfx/gfx_opengl.c b/src/pc/gfx/gfx_opengl.c
index 7bc9745..51824cc 100644
--- a/src/pc/gfx/gfx_opengl.c
+++ b/src/pc/gfx/gfx_opengl.c
@@ -8,7 +8,7 @@
 #endif
 #include <PR/gbi.h>

-#ifdef __MINGW32__
+#if defined(__MINGW32__) || defined(__APPLE__)
 #define FOR_WINDOWS 1
 #else
 #define FOR_WINDOWS 0
diff --git a/src/pc/gfx/gfx_sdl2.c b/src/pc/gfx/gfx_sdl2.c
index 4fd5c43..79622a5 100644
--- a/src/pc/gfx/gfx_sdl2.c
+++ b/src/pc/gfx/gfx_sdl2.c
@@ -2,7 +2,7 @@

 #if !defined(__linux__) && !defined(__BSD__) && defined(ENABLE_OPENGL)

-#ifdef __MINGW32__
+#if defined(__MINGW32__) || defined(__APPLE__)
 #define FOR_WINDOWS 1
 #else
 #define FOR_WINDOWS 0
diff --git a/src/pc/pc_main.c b/src/pc/pc_main.c
index 89aa1fa..d1fde8d 100644
--- a/src/pc/pc_main.c
+++ b/src/pc/pc_main.c
@@ -196,7 +196,7 @@ void main_func(void) {
         audio_api = &audio_alsa;
     }
 #endif
-#ifdef TARGET_WEB
+#if defined(TARGET_WEB) || defined(__APPLE__)
     if (audio_api == NULL && audio_sdl.init()) {
         audio_api = &audio_sdl;
     }
2022-03-21
unpkg 4.8It's released! Grab that macOS 12.3 compatibility while it's hot.
2021-09-06
Compile QEMU on macOS without tons of dependencies, M1 / Big Sur editionAn update to the 2020 documentation.
$ export QEMU_INSTALL=/path/to/qemu/install
$ brew install pkg-config pixman pcre
$ python3 -m venv qemu_install_venv
$ source qemu_install_venv/bin/activate
(qemu_install_venv) $ pip install --upgrade pip setuptools wheel
(qemu_install_venv) $ pip install ninja meson
(qemu_install_venv) $ curl -LO https://download.gnome.org/sources/glib/2.69/glib-2.69.2.tar.xz
(qemu_install_venv) $ tar xf glib-2.69.2.tar.xz && cd glib-2.69.2
(qemu_install_venv) $ meson --prefix=${QEMU_INSTALL} _build
(qemu_install_venv) $ ninja -C _build
(qemu_install_venv) $ ninja -C _build install
(qemu_install_venv) $ cd .. && curl -LO https://download.qemu.org/qemu-6.1.0.tar.xz
(qemu_install_venv) $ tar xf qemu-6.1.0.tar.xz && cd qemu-6.1.0
(qemu_install_venv) $ PKG_CONFIG_PATH=${QEMU_INSTALL}/lib/pkgconfig/ ./configure --enable-hvf --enable-cocoa --target-list=x86_64-softmmu --prefix=${QEMU_INSTALL}
(qemu_install_venv) $ PKG_CONFIG_PATH=${QEMU_INSTALL}/lib/pkgconfig/ make install
Ahh, much better:
$ otool -L ${QEMU_INSTALL}/bin/qemu-system-x86_64 | grep -vE '^\W+(/usr/lib/|/System/Library/)'
/Users/timdoug/qemu_install/bin/qemu-system-x86_64:
	/Users/timdoug/.homebrew/opt/pixman/lib/libpixman-1.0.dylib (compatibility version 41.0.0, current version 41.0.0)
	/Users/timdoug/qemu_install/lib/libgio-2.0.0.dylib (compatibility version 6903.0.0, current version 6903.0.0)
	/Users/timdoug/qemu_install/lib/libgobject-2.0.0.dylib (compatibility version 6903.0.0, current version 6903.0.0)
	/Users/timdoug/qemu_install/lib/libglib-2.0.0.dylib (compatibility version 6903.0.0, current version 6903.0.0)
	/Users/timdoug/qemu_install/lib/libgmodule-2.0.0.dylib (compatibility version 6903.0.0, current version 6903.0.0)
$
2021-06-14
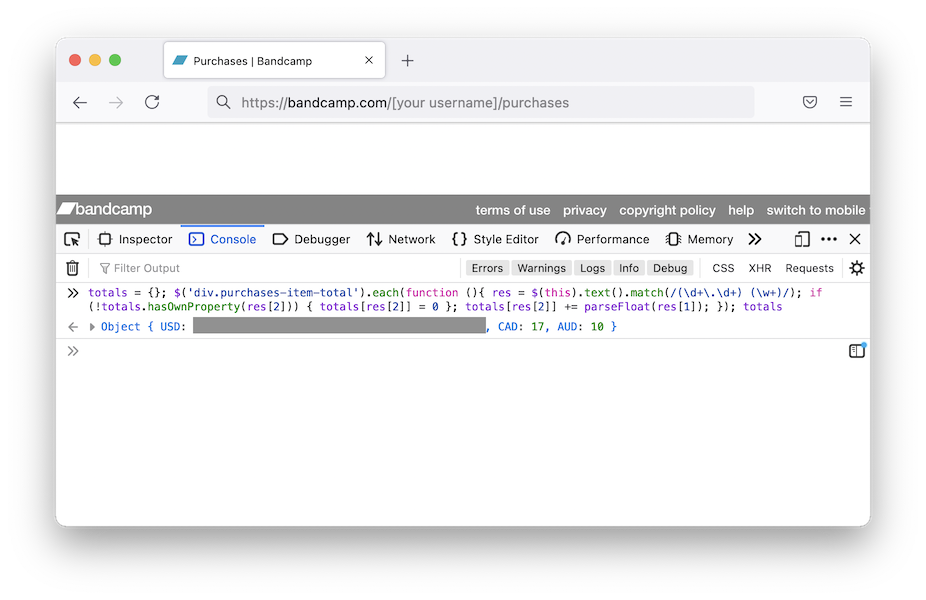
Quickly and easily sum your Bandcamp purchasesThis will give per-currency totals. Tested in Safari, Firefox, and Chrome.
- Log in to your Bandcamp account and visit the purchases page, i.e., https://bandcamp.com/[your username]/purchases
- Scroll to the bottom and click "view all NNN purchases"
- Keep scrolling down until all purchases have loaded
- Right-click on the page and select "Inspect" in Firefox/Chrome, or "Inspect Element" in Safari
- Click the "Console" tab in the inspector
- Firefox only: type allow pasting to enable execution of the following snippet
- Paste the following into the console and hit return:
totals = {}; $('div.purchases-item-total').each(function (){ res = $(this).text().match(/(\d+\.\d+) (\w+)/); if (!totals.hasOwnProperty(res[2])) { totals[res[2]] = 0 }; totals[res[2]] += parseFloat(res[1]); }); totals
2021-03-14
unpkg 4.7It's released! Grab that ARM goodness while it's hot.
2021-02-10
Fix Bluetooth audio issues on macOS Big SurI had all manners of issues that I couldn't figure out after trawling through Console.app logs:
- 3+ seconds of latency between hitting a play button and hearing audio
- Beach-balling when opening Zoom preferences
- Latency between pressing volume up/down keys and OS response
The solution: rm -r /Library/Audio/Plug-Ins/HAL/ACE.driver and restart. I had it from Rogue Amoeba's Audio Hijack; they're a great crew and I trust their kit, but for whatever reason this caused issues.
2020-12-28
Make keys repeat sanely in Citrix Viewer on a macOS Big SurNot sure if this change is a Citrix or Mac thing. Many thanks to Dennis Mathews for the tip.
$ defaults write com.citrix.receiver.icaviewer.mac ApplePressAndHoldEnabled -bool false
$
Then relaunch the process.
2020-08-30
Compile QEMU on macOS without tons of dependenciesbrew install qemu unnecessarily brings in Python, a DNS server, two TLS libraries, ....
Instead:
$ brew install pkg-config pixman
$ python3 -m venv qemu_install_venv
$ source qemu_install_venv/bin/activate
(qemu_install_venv) $ pip install ninja meson
(qemu_install_venv) $ curl -LO https://download.gnome.org/sources/glib/2.65/glib-2.65.2.tar.xz
(qemu_install_venv) $ tar xf glib-2.65.2.tar.xz && cd glib-2.65.2
(qemu_install_venv) $ meson --prefix=/path/to/qemu/install -Dinternal_pcre=true _build
(qemu_install_venv) $ ninja -C _build
(qemu_install_venv) $ ninja -C _build install
$ cd .. && curl -LO https://download.qemu.org/qemu-5.1.0.tar.xz
$ tar xf qemu-5.1.0.tar.xz && cd qemu-5.1.0
$ PKG_CONFIG_PATH=/path/to/qemu/install/lib/pkgconfig/ ./configure --enable-hvf --enable-cocoa --target-list=x86_64-softmmu --prefix=/path/to/qemu/install
$ PKG_CONFIG_PATH=/path/to/qemu/install/lib/pkgconfig/ make install
Ahh, much better:
$ otool -L /path/to/qemu/install/bin/qemu-system-x86_64 | grep -vE '^\W+(/usr/lib/|/System/Library/)'
/path/to/qemu/install/bin/qemu-system-x86_64:
	/path/to/qemu/install/lib/libgio-2.0.0.dylib (compatibility version 6503.0.0, current version 6503.0.0)
	/path/to/qemu/install/lib/libgobject-2.0.0.dylib (compatibility version 6503.0.0, current version 6503.0.0)
	/path/to/qemu/install/lib/libglib-2.0.0.dylib (compatibility version 6503.0.0, current version 6503.0.0)
	/path/to/qemu/install/lib/libintl.dylib (compatibility version 0.0.0, current version 0.0.0)
	/path/to/homebrew/opt/pixman/lib/libpixman-1.0.dylib (compatibility version 41.0.0, current version 41.0.0)
	/path/to/qemu/install/lib/libgthread-2.0.0.dylib (compatibility version 6503.0.0, current version 6503.0.0)
$
2020-04-19
Running a Windows 10 virtual machine with QEMU on macOSMicrosoft distributes a freely available image, but there are a few steps necessary for it to work with QEMU.
- Download the VirtualBox image and unzip.
- The .ova file is a tarball; extract.
- The .vmdk file is compressed, in a format to which QEMU can't write, resulting in Could not write to allocated cluster for streamOptimized errors. Convert to qcow2 with qemu-img.
- Start a modern system, using Hypervisor.framework, 4GB of RAM, and userland networking forwarding the RDP port as the VGA driver is functional but suboptimal:
qemu-system-x86_64 -machine q35 -accel hvf -m 4096 -nic user,hostfwd=tcp:127.0.0.1:3389-:3389 -hda WinDev2003Eval-disk001.qcow2
2020-01-26
Diagnosing WindowServer 50% CPU / ~50 FPS when seemingly idle in macOS MojaveThis seems to happen to me every time I twiddle time zone settings when traveling.
- iStat Menus (in my case; or similar) says the Intel GPU pushes 50 frames per second though the display is static
- Nothing particularly notable in Console.app.
- Tracing the WindowServer process in Activity Monitor.app (cmd-I; click "Sample") didn't point to any specific services
2019-11-12
Make keys repeat sanely in Citrix Viewer on a modern macOSNB: this is out of date. Consult newer docs.
$ defaults write com.citrix.XenAppViewer ApplePressAndHoldEnabled -bool false
$
Then relaunch the process.
2019-10-23
unpkg 4.6It's released! Grab that 64 bit Catalina goodness while it's hot.
2019-08-07
Stop unnecessary gettys on a Debian server
# systemctl mask getty-static.service
# systemctl mask getty@tty1.service
# systemctl mask serial-getty@hvc0.service
2019-06-10
Compiling EncFS on macOS Mojave 10.14 with static OpenSSLProbably works on older versions, too.
- Install FUSE for macOS.
- brew install cmake
- curl -LO 'https://www.openssl.org/source/openssl-1.1.1c.tar.gz'
- tar xf openssl-1.1.1c.tar.gz && cd openssl-1.1.1c && ./config no-shared --prefix=/Users/$(whoami)/openssl && make install && cd ..
- git clone https://github.com/vgough/encfs.git && cd encfs && mkdir build && cd build
- cmake .. -DFUSE_INCLUDE_DIR=/usr/local/include/osxfuse/ -DFUSE_LIBRARIES=/usr/local/lib/libosxfuse.dylib -DOPENSSL_ROOT_DIR=/Users/$(whoami)/openssl/ -OPENSSL_USE_STATIC_LIBS=TRUE -DENABLE_NLS=OFF
- make -j4
$ otool -L encfs
encfs:
	/usr/local/lib/libosxfuse.2.dylib (compatibility version 12.0.0, current version 12.7.0)
	/usr/lib/libc++.1.dylib (compatibility version 1.0.0, current version 400.9.4)
	/usr/lib/libSystem.B.dylib (compatibility version 1.0.0, current version 1252.250.1)
$
2018-12-28
Changing the ciphersuite preference order for TLSv1.3 with OpenSSL and nginxnginx doesn't (yet) support configuring TLSv1.3 ciphersuite order preference. It's hardcoded in OpenSSL in include/openssl/ssl.h, so to e.g. prioritize ChaCha20 over the AES suites, apply the following patch:
diff -urN openssl-1.1.1a-old/include/openssl/ssl.h openssl-1.1.1a/include/openssl/ssl.h
--- openssl-1.1.1a-old/include/openssl/ssl.h	2018-11-20 13:35:40.000000000 +0000
+++ openssl-1.1.1a/include/openssl/ssl.h	2018-12-26 05:32:44.915797200 +0000
@@ -173,8 +173,8 @@
 # define SSL_DEFAULT_CIPHER_LIST "ALL:!COMPLEMENTOFDEFAULT:!eNULL"
 /* This is the default set of TLSv1.3 ciphersuites */
 # if !defined(OPENSSL_NO_CHACHA) && !defined(OPENSSL_NO_POLY1305)
-#  define TLS_DEFAULT_CIPHERSUITES "TLS_AES_256_GCM_SHA384:" \
-                                   "TLS_CHACHA20_POLY1305_SHA256:" \
+#  define TLS_DEFAULT_CIPHERSUITES "TLS_CHACHA20_POLY1305_SHA256:" \
+                                   "TLS_AES_256_GCM_SHA384:" \
                                    "TLS_AES_128_GCM_SHA256"
 # else
 #  define TLS_DEFAULT_CIPHERSUITES "TLS_AES_256_GCM_SHA384:" \
Then build as normal: ./configure --with-openssl=/path/to/patched/openssl-1.1.1a etc.
2018-08-04
How to configure WireGuard to tunnel traffic from a macOS client through a Debian server with IPv4 and IPv6
- Follow the installation instructions on the WireGuard website.
- Generate keypairs for both the client and server: wg genkey | tee privatekey | wg pubkey > publickey
- Put the following in /etc/wireguard/wg0.conf on your Linux box, modifying accordingly.
[Interface]
Address = 10.222.222.1/24, fd00:222:222::1/64
ListenPort = REPLACE_WITH_SERVER_PORT
PrivateKey = REPLACE_WITH_SERVER_PRIVATE_KEY
PostUp   = iptables -A FORWARD -i %i -j ACCEPT; iptables -t nat -A POSTROUTING -o eth0 -j MASQUERADE ; ip6tables -A FORWARD -i %i -j ACCEPT; ip6tables -t nat -A POSTROUTING -o eth0 -j MASQUERADE
PostDown = iptables -D FORWARD -i %i -j ACCEPT; iptables -t nat -D POSTROUTING -o eth0 -j MASQUERADE ; ip6tables -D FORWARD -i %i -j ACCEPT; ip6tables -t nat -D POSTROUTING -o eth0 -j MASQUERADE

[Peer]
PublicKey = REPLACE_WITH_CLIENT_PUBLIC_KEY
AllowedIPs = 10.222.222.2/32, fd00:222:222::2/128
- Put the following in /etc/wireguard/utun.conf on your Mac, modifying accordingly. macOS requires the utun naming; choose utun[0-9] if you want to be explicit, but with no trailing integer the OS will choose one for you. Additionally, this config uses CloudFlare's DNS servers, but that line is not a requirement.
[Interface]
Address = 10.222.222.2/32, fd00:222:222::2/128
PrivateKey = REPLACE_WITH_CLIENT_PRIVATE_KEY
DNS = 1.1.1.1, 2606:4700:4700::1111

[Peer]
Endpoint = REPLACE_WITH_SERVER_IP:REPLACE_WITH_SERVER_PORT
PublicKey = REPLACE_WITH_SERVER_PUBLIC_KEY
AllowedIPs = 0.0.0.0/0, ::/0
- Ensure IPv4 and IPv6 forwarding are enabled. Add net.ipv4.ip_forward=1 and net.ipv6.conf.all.forwarding=1 to /etc/sysctl.conf and run sysctl -p.
- For unclear reasons, the static IP address on my VPS had its primary IPv6 preferred lifetime set to 0, i.e., deprecated. When the WireGuard IPv6 interface came up, no packets were routed through the deprecated interface, so I had to explicitly set its preferred lifetime to forever. The preferred-lifetime option in /etc/network/interfaces didn't work for me, so I added this explicit post-up line to the interface definition in /etc/network/interfaces:
post-up ip addr change REPLACE_WITH_SERVER_PUBLIC_IPV6_ADDR/64 dev eth0 preferred_lft forever
- Start the interface on the server: wg-quick up wg0
- Start the interface on the client: wg-quick up utun
2017-06-01
Installing Debian in xhyvexhyve is a nice and lightweight hypervisor for macOS. Getting Debian running on it requires a bit of effort though; the following instructions result in a functional installation with working networking.
- git clone https://github.com/mist64/xhyve.git
- Apply this patch so there's enough space for the installer ramdisk (thanks to this PR for the tip):
- make
- Grab the Debian installer kernel and initrd. I use the daily snapshots, but substitute accordingly.
curl https://d-i.debian.org/daily-images/amd64/daily/netboot/debian-installer/amd64/initrd.gz -o initrd.gz-installer curl https://d-i.debian.org/daily-images/amd64/daily/netboot/debian-installer/amd64/linux -o linux-installer
- Create an empty disk image: dd if=/dev/zero of=debian.img bs=1m count=8192
- Grab a UUID so the VM comes up with the same IP address every launch: python -c 'import uuid; print uuid.uuid4()'
- Run the Debian installer, changing options accordingly (1G is RAM size, the arguments to virtio-blk and the kexec firmware are paths): sudo ./build/xhyve -A -H -U <<<YOUR UUID HERE>>> -m 1G -s 0,hostbridge -s 1,lpc -s 2,virtio-blk,debian.img -s 3,virtio-net -l com1,stdio -f "kexec,linux-installer,initrd.gz-installer,earlyprintk=serial console=ttyS0" Feel free to skip bootloader installation, since we use xhyve's kexec implementation.
- We now need to grab the non-installer kernel and initrd out of the disk image.
- Boot into the installer's recovery mode by passing rescue/enable=true: sudo ./build/xhyve -A -H -U <<<YOUR UUID HERE>>> -m 1G -s 0,hostbridge -s 1,lpc -s 2,virtio-blk,debian.img -s 3,virtio-net -l com1,stdio -f "kexec,linux-installer,initrd.gz-installer,earlyprintk=serial console=ttyS0 rescue/enable=true"
- Use /dev/vda1 as the root filesystem and execute a shell there (both the defaults), then type bash to get a sane one.
- apt-get install netcat
- On the host run nc -l 8000 >vmlinuz, and on the VM run nc 192.168.64.1 8000 </boot/vmlinuz*. You'll have to manually ctrl-C after the (essentially instant) transfer is complete.
- Do the same for the initrd.img in /boot.
- Verify checksums and sanity otherwise:
host$ file vmlinuz initrd.img vmlinuz: Linux kernel x86 boot executable bzImage, version 4.9.0-3-amd64 (debian-kernel@lists.debian.org) #1 SMP Debian 4., RO-rootFS, swap_dev 0x3, Normal VGA initrd.img: gzip compressed data, last modified: Thu Jun 1 16:23:39 2017, from Unix host$
- Exit out of bash and the chroot, then "reboot" the system.
- Start your new VM, being sure to change the kernel/initrd paths and set the root partition's location accordingly: sudo ./build/xhyve -A -H -U <<<YOUR UUID HERE>>> -m 1G -s 0,hostbridge -s 1,lpc -s 2,virtio-blk,debian.img -s 3,virtio-net -l com1,stdio -f "kexec,vmlinuz,initrd.img,earlyprintk=serial console=ttyS0 root=/dev/vda1"
- Success! Install an SSH server, get work done, etc.
diff --git a/src/firmware/kexec.c b/src/firmware/kexec.c
index 61aeebb..2a5ce67 100644
--- a/src/firmware/kexec.c
+++ b/src/firmware/kexec.c
@@ -184,7 +184,7 @@ kexec_load_ramdisk(char *path) {
        sz = (size_t) ftell(f);
        fseek(f, 0, SEEK_SET);

-       ramdisk_start = ALIGNUP((kernel.base + kernel.size), 0x1000ull);
+       ramdisk_start = ALIGNUP((kernel.base + kernel.size + 32*1024*1024), 0x1000ull);

        if ((ramdisk_start + sz) > memory.size) {
                /* not enough memory */
- I know xhyve and Hypervisor.framework don't require root privileges, but the virtio-net implementation does. I haven't tried using a TUN/TAP device.
- Little Snitch, mDNSResponder, and xhyve have some sort of interaction that (at least with my configuration) requires explicit incoming/outgoing DNS access, otherwise it silently prevents networking from working. Once I whitelist the client IP and UDP/53 in my firewall rules, names are successfully resolved.
2014-12-17
Using the TCP MD5 Signature Option in LinuxIt's entirely undocumented, for good reason. In case you also have a peculiar interest in RFC2385, this is what you need to do:
Not actually that hard. A successful application, with -M and the key passed to tcpdump, will show md5valid in the TCP options. An incorrect key will show md5invalid.#include <linux/tcp.h> ... struct tcp_md5sig md5sig; char *key = "foobar"; /* addr is the struck sockaddr * passed to connect(2), from getaddrinfo() or otherwise */ memcpy(&md5sig.tcpm_addr, addr, sizeof addr); md5sig.tcpm_keylen = strlen(key); memcpy(&md5sig.tcpm_key, key, md5sig.tcpm_keylen); setsockopt(sockfd, IPPROTO_TCP, TCP_MD5SIG, &md5sig, sizeof md5sig);
2014-05-30
Using TLS v1.2 with OpenVPN 2.3.4It's disabled by default, and if you add e.g. tls-cipher TLS-DHE-RSA-WITH-AES-256-GCM-SHA384 (a TLS v1.2 cipher) to your server config it silently breaks. The solution is to add tls-version-min 1.2 to both the server and client config, and then it works like a charm. OpenVPN 2.3.3 added support for v1.2, so this won't work with anything older than 2.3.3.
2014-04-21
How to Watch Sopcast/Ustream Feeds with VLC on Mac OS XFor certain international sports, the two most popular kinds of streams I've come across are Sopcast and Ustream. Both require a bit of work to set up, but they tend to provide 720p-quality and in VLC they don't contain the endless barrage of advertisements or cause Flash Player-related CPU hogging. I suggest you set everything up well in advance and test with non-sport streams.
Ustream
- Install Xcode through the App Store. This is needed to build the following tools.
- Download VLC and make sure to copy it to /Applications.
- Install Homebrew. The instructions on the page should be self-explanatory.
- Open Terminal.app and type:
- brew install rtmpdump
- sudo bash -c "CFLAGS=-Qunused-arguments CPPFLAGS=-Qunused-arguments easy_install cffi"
- sudo bash -c "CFLAGS=-Qunused-arguments CPPFLAGS=-Qunused-arguments easy_install python-librtmp"
- sudo easy_install livestreamer
- Once you've got a Ustream URL, open Terminal.app and type livestreamer http://www.ustream.tv/eukanuba substituting the URL appropriately. It'll spit out a list of quality settings.
- With that quality setting, now type livestreamer http://www.ustream.tv/eukanuba 480p (note the suffixed quality value) and it'll open VLC and start your stream. Make sure to leave Terminal.app open, or your stream will stop.
Sopcast
- Download the Mac .dmg from here.
- Mount the downloaded disk image but don't do anything with the application.
- Open Terminal.app and type mkdir -p ~/bin && cp /Volumes/SopCast/SopCast.app/Contents/Resources/binaries/m32/sp-sc-auth ~/bin. You can now unmount and remove the disk image. Everything up to now you only need to do once.
- When you've found a stream, open Terminal.app again and type ~/bin/spsc-auth sop://broker.sopcast.com:3912/xxxxxx 3000 3001 (substituting the Sopcast URL appropriately) and leave it running. If you quit Terminal.app it'll stop the stream.
- Open VLC and go to File -> Open Network.... In the URL field type http://localhost:3001 and click Open; you should be good to go.
2014-04-17
Setting up IPv6 with Sonic.net and an OpenWRT RouterThis uses the newer 6rd mechanism instead of the 6in4 tunnels, so other documentation you enounter may inapplicable. I'm using nightly builds; YMMV with stable builds.
- Enable "LAN Subport" on the equipment provided by Sonic.net for your OpenWRT router (might work with double NAT, haven't tried)
- On your router: opkg update && opkg install 6rd (if it complains about version conflicts, try flashing the most recent build)
- Make the wan6 entry in your /etc/config/network look like so:
config interface 'wan6' option proto '6rd' option peeraddr '184.23.144.1' option ip6prefix '2602:240::' option ip6prefixlen '28' - /etc/init.d/networking restart
- Disconnect and reconnect your machine, and IPv6 autoconfiguration should be good to go.
2013-07-02
The smallest preseed file for an entirely automated Ubuntu 12.04 Precise Pangolin installPass these options on the kernel command line: auto=true priority=critical url=http://your.server/foo.seed, and use this preseed file:
d-i debian-installer/locale string en_US.UTF-8

d-i passwd/root-login boolean true
d-i passwd/make-user boolean false
d-i passwd/root-password password changemeplease
d-i passwd/root-password-again password changemeplease

d-i partman-auto/method string regular
d-i partman-auto/choose_recipe select atomic
d-i partman/choose_partition select finish
d-i partman/confirm boolean true
d-i partman/confirm_nooverwrite boolean true

d-i finish-install/reboot_in_progress note
This will assuredly do thinks you don't want / care about, to make sure to amend it accordingly.
2013-05-15
I can't install gcc on OpenLogic CentOS!Yeah, someone really dropped the ball here. If you see this when you try to yum install gcc:
--> Finished Dependency Resolution
Error: Package: glibc-headers-2.12-1.80.el6_3.7.x86_64 (updates)
           Requires: kernel-headers
Error: Package: glibc-headers-2.12-1.80.el6_3.7.x86_64 (updates)
           Requires: kernel-headers >= 2.2.1
 You could try using --skip-broken to work around the problem
 You could try running: rpm -Va --nofiles --nodigest
Then try doing this: sudo yum --disableexcludes=main install kernel-headers-*.el6.openlogic.x86_64
I don't know who's the idiot who put exclude=kernel* in /etc/yum.conf to break installing gcc, but...you're an idiot.
2013-03-26
How to install and use Errbit through nginx & PassengerCapistrano scares the shit out of me. I'd rather know what I'm deploying, rather than rely on some foreign script, thank you very much. To install Errbit and deploy with Passenger through nginx, try this:
git clone https://github.com/errbit/errbit.git
rake errbit:copy_configs
vi config/config.yml # and change hostnames / SMTP settings
vi config/mongoid.yml # and change production mongo settings
echo "Errbit::Application.config.secret_token = '$(bundle exec rake secret)'" > config/initializers/secret_token.rb
RAILS_ENV=production rake assets:precompile
RAILS_ENV=production rake db:mongoid:create_indexes
RAILS_ENV=production rake db:seed
Then add something like the following to your nginx config:
server {
    listen 8080;
    server_name errbit.example.com;
    root /wherever/errbit/public;
    passenger_enabled on;
    rails_env production;
}
2013-01-23
Use tcpdump to download arbitrary Flash videosI came across an interesting video on the web that I wanted to watch offline, but it played through a Flash application, there were no download links, grabbing the stream by looking through the HTML/DOM was nontrivial, and the youtube-dl mainstay didn't work. tcpdump to the rescue!
- tcpdump -v -i <interface> -w output.cap
- Load the video up and start playing. Sadly, this has to be done in real-time.
- When done, tcpflow -r output.cap
- The largest file should be your video; use an editor to strip the HTTP headers from the beginning.
- If all goes well, you should have a video.flv. For extra credit, use ffmpeg -i video.flv to see if it's H.264/AAC. If so, use ffmpeg -i video.flv -acodec copy -vcodec copy video.mp4 for lossless container conversion to a standard MPEG-4 Part 14 file.
2013-01-21
How to send email through Gmail / Google Apps Email with the Amazon Linux AMI on EC2First, install the Heirloom mailx client with yum install mailx. The NSS certificates included with the AMI are either out of date or incomplete, so you've got to grab the Equifax root cert and set it up yourself, like this:
wget https://www.geotrust.com/resources/root_certificates/certificates/Equifax_Secure_Certificate_Authority.cer
certutil -d ~/.mailcerts/ -A -t TC -n "Equifax Secure Certificate Authority" -i Equifax_Secure_Certificate_Authority.cer
Then set up your ~/.mailrc like this:
set smtp-use-starttls
set smtp=smtp://smtp.gmail.com:587
set smtp-auth=login
set smtp-auth-user="your_username@example.com"
set smtp-auth-password="your_password"
set from="your_username@example.com"
set nss-config-dir="~/.mailcerts"
set ssl-verify=warn
That last "ssl-verify=warn" line looks pretty dangerous, and it definitely could be. I needed it because otherwise mailx would bark with Comparing DNS name: "smtp.gmail.com" Continue (y/n)? and...giving up, instead of accepting any input. For whatever reason my Debian box works fine without this line. Also, one could use this line without setting up the root certificate appropriately, but that's playing a bit too fast and loose for me.
With this configuration you should be good to go with: echo "body here" | mailx -s "Subject here" recipient@example.com
2012-12-22
My 2007-era MacBookPro3,1 doesn't fully go to sleep / cannot wake from sleep with 10.8!Yep, I had a reason to break out my old MBP and install the newest version of OS X on it. It works wonderfully for a five year old box (the SSD sure helps!), except for not being able to sleep properly. What worked for me was disabling "safe sleep" a la this hint.
sudo pmset -a hibernatemode 0
sudo nvram "use-nvramrc?"=false
Then restart. You can also remove /private/var/vm/sleepimage to save some space, which is nice.
2012-12-13
How to install a fully patched and up-to-date lighttpd on Debian unstable that passes Qualys SSL Labs' tests
...well, except for the cipher suites that require an OpenSSL >= 1.0.0, but that's an adventure for another day.
wget http://redmine.lighttpd.net/attachments/download/1395/ssl-compression.diff
wget http://ftp.us.debian.org/debian/pool/main/l/lighttpd/lighttpd_1.4.31-3.debian.tar.gz
wget http://ftp.us.debian.org/debian/pool/main/l/lighttpd/lighttpd_1.4.31.orig.tar.gz
tar xvzf lighttpd_1.4.31.orig.tar.gz
cd lighttpd-1.4.31/
tar xvzf ../lighttpd_1.4.31-3.debian.tar.gz
vi debian/control [and get rid of the dpkg-dev version dependency]
vi debian/rules [and get rid of the "export=config" line and the previous backslash]
patch -p1 <../ssl-compression.diff
debuild -us -uc
[then install all of the dependencies it barks about and try again...]
cd ..
sudo dpkg -i lighttpd_1.4.31-3_amd64.deb
sudo /etc/init.d/lighttpd restart
And make sure these options are in your lighttpd ssl.conf:
    ssl.cipher-list = "RC4-SHA:AES256-SHA:AES128-SHA:DES-CBC3-SHA"
    ssl.honor-cipher-order = "enable"
    ssl.use-sslv2 = "disable"
    ssl.use-sslv3 = "disable"
    ssl.use-compression = "disable"
2012-02-08
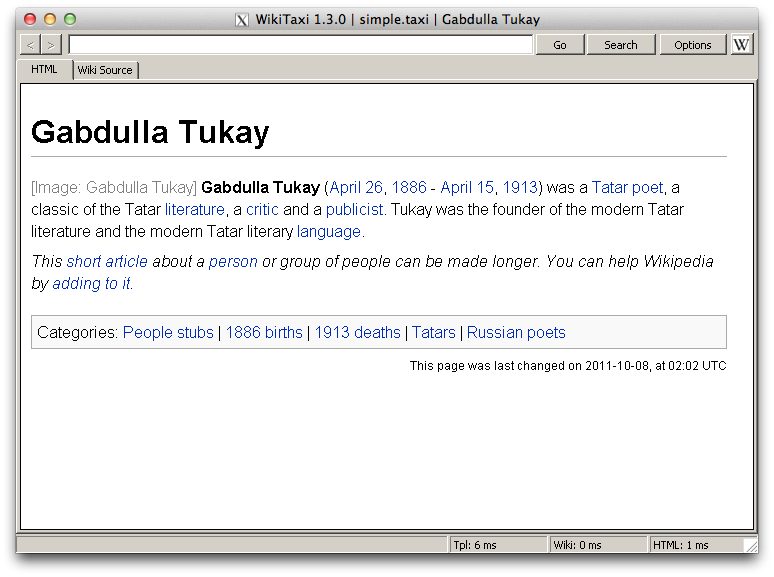
Offline Wikipeda on Mac OS X- Install Homebrew.
- brew install --use-gcc wine
- Prefix the WikiTaxi binaries with wine, e.g., wine WikiTaxi_Importer.exe, and otherwise follow the instructions on the WikiTaxi page.
2010-11-09
NFS doesn't work!Unable to start nfsd or portmap in Debian? Getting weird errors in /var/log like the following?
- rpcbind: server localhost not responding, timed out
- RPC: failed to contact local rpcbind server (errno 5).
- RPC: failed to contact local rpcbind server (errno 512).
- nfssvc: Setting version failed: errno 16 (Device or resource busy)
- nfssvc: writting fds to kernel failed: errno 5 (Input/output error)
auto lo
iface lo inet loopback
2010-08-27
unpkg 4.5It's released! Grab it while it's hot.
2010-08-25
Compiling for older versions of Mac OS XIn preparation for a pending semi-major release of unpkg, I needed to compile some source for other architectures and older versions of Mac OS X on my Snow Leopard MacBook Pro. After quite some time DuckDuckGoing and wrestling with gcc, I came across these combinations of environment variables that seem to do the trick. (The following, of course, require the appropriate 10.4 and 10.5 SDKs to be installed in /Developer/SDKs.)
10.4 and PowerPC
CC="gcc-4.0 -arch ppc" \
CXX="g++-4.0 -arch ppc" \
CFLAGS="-mmacosx-version-min=10.4" \
CPPFLAGS="-DMAC_OS_X_VERSION_MIN_REQUIRED=1040 -nostdinc \
-F/Developer/SDKs/MacOSX10.4u.sdk/System/Library/Frameworks \
-I/Developer/SDKs/MacOSX10.4u.sdk/usr/lib/gcc/powerpc-apple-darwin10/4.0.1/include \
-isystem /Developer/SDKs/MacOSX10.4u.sdk/usr/include" \
LDFLAGS="-arch ppc -mmacosx-version-min=10.4 \
-L/Developer/SDKs/MacOSX10.4u.sdk/usr/lib \
-F/Developer/SDKs/MacOSX10.4u.sdk/System/Library/Frameworks \
-Wl,-syslibroot,/Developer/SDKs/MacOSX10.4u.sdk" \
./configure --build=`uname -p`-apple-darwin --host=powerpc-apple-darwin
10.4 and i386
CC="gcc-4.0 -arch i386" \
CXX="g++-4.0 -arch i386" \
CFLAGS="-mmacosx-version-min=10.4" \
CPPFLAGS="-DMAC_OS_X_VERSION_MIN_REQUIRED=1040 -nostdinc \
-F/Developer/SDKs/MacOSX10.4u.sdk/System/Library/Frameworks \
-I/Developer/SDKs/MacOSX10.4u.sdk/usr/lib/gcc/i686-apple-darwin10/4.0.1/include \
-isystem /Developer/SDKs/MacOSX10.4u.sdk/usr/include" \
LDFLAGS="-arch i386 -mmacosx-version-min=10.4 \
-L/Developer/SDKs/MacOSX10.4u.sdk/usr/lib \
-F/Developer/SDKs/MacOSX10.4u.sdk/System/Library/Frameworks \
-Wl,-syslibroot,/Developer/SDKs/MacOSX10.4u.sdk" \
./configure
10.5 and x86_64 -- the 10.4 gcc-4.0 can't compile for x86_64, so we have to use 10.5 instead.
CC="gcc-4.2 -arch x86_64" \
CXX="g++-4.2 -arch x86_64" \
CFLAGS="-mmacosx-version-min=10.5" \
CPPFLAGS="-DMAC_OS_X_VERSION_MIN_REQUIRED=1050 -nostdinc \
-F/Developer/SDKs/MacOSX10.5.sdk/System/Library/Frameworks \
-I/Developer/SDKs/MacOSX10.5.sdk/usr/lib/gcc/i686-apple-darwin10/4.2.1/include \
-isystem /Developer/SDKs/MacOSX10.5.sdk/usr/include" \
LDFLAGS="-arch x86_64 -mmacosx-version-min=10.5 \
-L/Developer/SDKs/MacOSX10.5.sdk/usr/lib \
-F/Developer/SDKs/MacOSX10.5.sdk/System/Library/Frameworks \
-Wl,-syslibroot,/Developer/SDKs/MacOSX10.5.sdk" \
./configure
Then combine the binaries, like so: lipo foo-i386 foo-ppc foo-x86_64 -output foo-fat -create.
2010-07-26
Converting a .mkv file to .mp4 to play on the iPadProblem: you acquire a MKV file you want to play on your iPad. It's already H264/AAC, which the iPad can handle, so you don't want to re-encode it.
Solution: extract the tracks with mkvextract, and mux them into an iPad-friendly MP4 with MP4Box.
- Get a GPAC Subversion snapshot from http://gpac.sourceforge.net/.
- Build it. It's a bit finicky, and it will probably crap out looking for nonexistent wxwidgets libraries, but hopefully before that it'll create an MP4Box binary in bin/gcc.
- Grab a Mac OS X binary of MKVToolnix. Its dependencies are pretty extensive, so I used the binary available here.
- Determine what's in the mkv container: Mkvtoolnix.app/Contents/MacOS/mkvinfo Foo.mkv
- It'll tell you that, e.g., track one is H264 video at 24 fps, and track two is AAC.
- Extract the tracks accordingly: Mkvtoolnix.app/Contents/MacOS/mkvextract tracks Foo.mkv 1:Foo.h264 2:Foo.aac
- Put them back together in an MP4: MP4Box -add Foo.aac -add Foo.h264 -fps 24 Foo.mp4
Sometimes, though, you'll get audio in a non-AAC format (e.g., MP3 or AC3). This requires conversion.
- Download, make, and install the libfaac library. (We'd use FFmpeg's internal AAC encoder, but currently it's broken.)
- Do the same with FFmpeg, making sure to point it to libfaac appropriately.
- Convert the extracted audio file to AAC: ffmpeg -i Foo.ac3 -acodec libfaac -ab 192k Foo.aac
- Then use MP4Box as before, but with your new .aac file.
2010-07-23
DuckDuckGo search box in JavaScriptSometimes, at work, we have terrible internet latency. This makes every page loaded count. I use DuckDuckGo as my primary search engine, and sometimes poor caching and latency combine to create a few seconds between starting to load the page and entering my query. So I whipped up a little Bookmarklet to bring up an equivalent search box, instantly. Hooray JavaScript! (The only time I'll ever say that...)
Here, drag: DDG
Works wonderfully as a hot-key, e.g., cmd-2 in Safari as the second link in my Bookmarks bar.
2010-04-15
METAL Basic for the Mac (or: yet another young kid's introduction to programming)Like many programmers, I was introduced to the craft through a BASIC dialect, specifically a MacOS-only one named METAL. I was taking extracurricular classes in C++ at the time, but the SIOUX (Simple Input Output User eXchange, i.e., the I/O offered by cin/cout) Mac runtime we used couldn't do anything graphical.
I can't remember how I stumbled upon METAL, but I have fond memories of heading to my friend's house, putting Cowgirl by Underworld on repeat, and seeing what we could get this simple language to do. We never created anything ground-breaking, of course -- a few simple point-'n'-shoot pseudo-3D games, for example -- but man would those coding sessions be serious.
Upon entering high school, we moved on to bigger and better languages. My friend found the Macromedia Flash MX (ca. 2002?) application on our school's computers, and I somehow dove deep into Java. I remember when version 1.5 (...5.0) came out, and thinking that generics and auto(un)boxing were the shit.
Anyway. METAL v1.7.3 was nevertheless my bread and butter for a few years. I recall checking its website once, noticing that an incredible v2.0 was on its way. To this day, the website still has "METAL v2.0 ULTRA" listed as ??? percent done.
That is, the Wayback Machine's version of the website. Naturally, the author graduated, and his personal website disappeared. It's still available here: http://web.archive.org/web/20080327004511/www.iit.edu/~sarimar/GDS/. METAL can be downloaded from there.
It still runs on Snow Leopard through Rosetta. Trying to run code results
in a crashing runtime, but when "compiled" the resultant executable works fine.
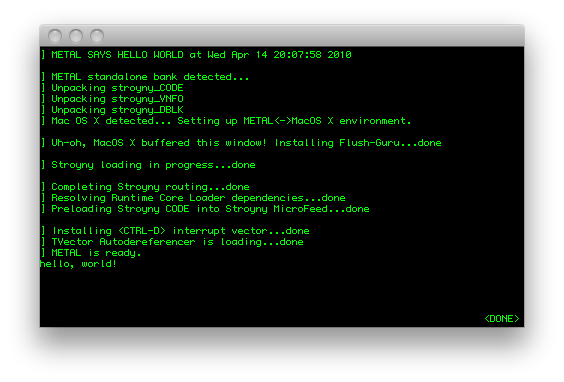
If I ever stumble upon some old code I've written in METAL I'll post the
atrocities. And I owe its author, Marin Saric, a beer or two.
2010-03-02
What CPUs do the Amazon EC2 High-Memory On-Demand Instances use?
I can't vouch for the Extra Large or Double Extra Large ones, but the Quadruple Extra Large ones use Nehalem-based Gainestown Intel Xeon X5550 @ 2.67GHz.
processor : 0 vendor_id : GenuineIntel cpu family : 6 model : 26 model name : Intel(R) Xeon(R) CPU X5550 @ 2.67GHz stepping : 5 cpu MHz : 2666.760 cache size : 8192 KB physical id : 0 siblings : 1core id : 0 cpu cores : 1 fpu : yes fpu_exception : yes cpuid level : 11 wp : yes flags : fpu tsc msr pae mce cx8 apic mca cmov pat pse36 clflush dts acpi mmx fxsr sse sse2 ss ht tm syscall nx lm constant_tsc pni monitor ds_cpl vmx est tm2 ssse3 cx16 xtpr dca popcnt lahf_lm bogomips : 5337.91 clflush size : 64 cache_alignment : 64 address sizes : 40 bits physical, 48 bits virtual power management:The Authoritative List of Packages Needed to Comile the WikiReader Firmware
This is for a 32-bit Ubuntu Karmic schroot (as outlined in doc/Using-schroot.text) on a 64-bit Debian stable installation.
flex
bison
ocaml
python
python-gd
gforth
guile-1.8
gawk
php5-cli
php5-sqlite
sqlite3
xfonts-utils
cjk-latex
dvipng
qt4-qmake
libqt4-dev
sudo
wget
2009-12-28
Using SheepShaver on Mac OS XBuild as listed on the website. Video uses X and audio goes through CoreAudio, so you don't need SDL. A few other bits of information, though:
- For working keyboard shortcuts, disable "Enable key equivalents under X11" in X11.app.
- For sound output, select "Built-in" in the Sound control panel.
- Launch with this command:
./SheepShaver --rom /wherever/macos.rom --disk /wherever/harddrive.img --frameskip 0 --ramsize 268435456 --ignoresegv true --ignoreillegal true --ether slirp --idlewait true --keycodes true --keycodefile keycodes
This gives you working ethernet, keyboard shortcuts, smooth video, 256MB of RAM, and better stability through ignoring SEGV and illegal instructions.
2009-12-05
Help! I have no /dev/dsp!Just modprobe snd_pcm_oss and snd_mixer_oss, and restart udev. Then relive all your old Mac game meories through SheepShaver...
2009-12-01
How to type accents in XYou'll want to use something called the Compose Key. Good instructions on this site, but here's a quick installation summary:
- Use xev to get the name of the key you want to use, e.g., Super_L
- Try it out with xmodmap -e "keysym Super_L = Multi_key" (hint: capitalization is important!)
- Put the xmodmap command in ~/.xmodmaprc for permanence.
2009-11-02
My Terminal Emulator Setup in DebianOn my Debian boxes I use evilwm as my window manager, because it gets out of my way in just the way I like. Hence, I don't use gnome-terminal or kterm or ETerm or what have you; xterm has worked perfectly fine.
Nevertheless, I frequently spawn a lot of terminals, and the 5MB that each xterm process eats up (not including the 3MB bash does) add up after I fill a few virtual desktops with terminals. Xterm is also quite slow: cat'ing a 15K line banner output takes ~4 seconds on my netbook.
Hence, I went looking for replacements. Rxvt takes ~2MB per instance and cats the same file in ~1.2 seconds. Mrxvt takes ~3MB and ~0.5 seconds. Rxvt-unicode takes the cake, though, at ~3 MB and ~0.3 seconds. The real kicker, though, is its "daemon" mode, in which only once process is spawned for all "client" terminals, saving a lot of RAM. (Just hope it doesn't crash!)
Here's my setup:
- apt-get install rxvt-unicode-lite
- ~/.Xresources: (for a nice black-on-white xterm-like experience)
URxvt*scrollBar: false
URxvt*reverseVideo: true
- sudo update-alternatives --config x-terminal-emulator and select urxvtcd
2009-10-18
How to set up the QT4 WikiReader simulator in Debian unstable
- Certain build scripts require Python 2.6, so find some way to install it (Debian experimental, by source, etc.)
- apt-get install libqt4-dev qt4-qmake netpbm gforth build-essential php5-cli sqlite3
- git clone git://github.com/wikireader/wikireader.git
- cd wikireader/samo-lib/include
- Copy config.h-default to config.h and uncomment the SIMULATOR #define.
- make qt4-simulator
- Breakage will occur. Be merciless with hackage! I had to change a few lines of C and asm when functions weren't defined, etc.
- mkdir image work
- make DESTDIR=image WORKDIR=work XML_FILES=xml-file-samples/japanese_architects.xml index parse render combine (per doc/QuickStart)
- make DESTDIR=image install
- cp host-tools/qt4-simulator/bin/wikisim image/
- cd image
- ./wikisim It will segfault soon enough, but you'll hopefully be able to get in a bit of reading on Japanese architects. Good luck!
2009-09-15
Installing SheepShaver and BasiliskII on DebianI've tested SheepShaver with Mac OS 7.6.1 and Mac OS 8.1 with a 4MB OldWorld ROM. Sound works (even though ESD isn't used), video works, haven't tried ethernet. (all done on my current Debian unstable Intel Atom netbook.) The same instructions work for BasiliskII.
- Install the following packages: build-essential autoconf2.59 automake1.4 libxt-dev libxext-dev libxxf86dga-dev libxxf86vm-dev
- Follow the instructions here to download and the source from CVS, and make links as directed.
- Patch autogen.sh in src/Unix thusly:
--- old/SheepShaver/src/Unix/autogen.sh 2007-06-13 14:09:05.000000000 +0200
+++ ss2/SheepShaver/src/Unix/autogen.sh 2009-09-15 12:21:32.000000000 +0200
@@ -40,13 +40,13 @@

 aclocalinclude="$ACLOCAL_FLAGS"; \
 (echo $_echo_n " + Running aclocal: $_echo_c"; \
-    aclocal $aclocalinclude; \
+    aclocal-1.4 $aclocalinclude; \
  echo "done.") && \
 (echo $_echo_n " + Running autoheader: $_echo_c"; \
-    autoheader; \
+    autoheader2.59; \
  echo "done.") && \
 (echo $_echo_n " + Running autoconf: $_echo_c"; \
-    autoconf; \
+    autoconf2.59; \
  echo "done.")

 rm -f config.cache
- The output should look something like this:
SheepShaver configuration summary:

SDL support ...................... : none
FBDev DGA support ................ : yes
XFree86 DGA support .............. : yes
XFree86 VidMode support .......... : yes
Using PowerPC emulator ........... : yes
Enable JIT compiler .............. : yes
Enable video on SEGV signals ..... : yes
ESD sound support ................ : no
GTK user interface ............... : no
mon debugger support ............. : no
Addressing mode .................. : real
Bad memory access recovery type .. : siginfo

Configuration done. Now type "make".
- Patch sys_unix.cpp in src/Unix thusly:
--- sys_unix.cpp.old 2009-09-15 12:28:54.000000000 +0200 +++ sys_unix.cpp 2009-09-15 12:29:06.000000000 +0200 @@ -883,11 +883,6 @@ } } #endif -#ifdef CDROM_DRIVE_STATUS - if (fh->cdrom_cap & CDC_DRIVE_STATUS) { - return ioctl(fh->fd, CDROM_DRIVE_STATUS, CDSL_CURRENT) == CDS_DISC_OK; - } -#endif cdrom_tochdr header; return ioctl(fh->fd, CDROMREADTOCHDR, &header) == 0; #elif defined(__FreeBSD__) || defined(__NetBSD__) - Make.
- If SheepShaver gets angry about ERROR: Cannot map Low Memory Globals: Permission denied. try: sudo sysctl -w vm.mmap_min_addr=0
2009-08-25
Yet Another MSI Wind Hackintosh TutorialJust contributing my method. General outline: install OSX on an external drive from a MacBook, then copy the installation to the internal Wind drive.
Requirements:
- MacBook
- Leopard DVD
- External HD / USB drive (I'm using a 320GB one -- anything that can hold an OSX installation should work)
- Mac OS X 10.5.7 Combo Update
- Chameleon
- SuperDuper!
- CyberGreg's driver pack (google around)
- Boot the MacBook from the Leopard DVD.
- Partition the external drive, with a GUID scheme.
- Reboot and install the 10.5.7 update (newest 10.5.8 doesn't have good support at time of writing), reboot.
- Install CyberGreg's driver pack.
- Install Chameleon on the external drive.
- Boot the Wind from the external drive.
- Use SuperDuper to copy the OSX installation to the interal drive.
- Run Chameleon again on the interal drive.
2009-08-21
When bit twiddling, make sure to use unsigned types.
This public service announcement was brought to you by the "Why The Fuck
Don't My Bit Shifts Work" Department.
Goodness, that was amateur.
2009-08-09
GMABooster segfaults on my machine!Run it is root.
2009-07-22
Benchmarking Intel's UXA, round 2
Debian unstable just upgraded to xserver-xorg-video-intel version 2.8.0.
(released two days ago -- who says Debian is out of date?)
This release is notable in that it removes support for EXA and DRI1,
leaving only UXA and DRI2 for acceleration. Considering my previous
benchmarking attempts, I thought it was only right to check the new
drivers.
- UXA, 2.8.0 (new-school)
- 100 runs: 18.17 seconds
- 200 runs: 38.32 seconds
2009-07-21
Installing Grub 2 on Debian sidSid has recently moved grub to grub-legacy and made grub 2 the default. My installation went fine -- all I had to do was remove grub-legacy (because of some conflicting man pages) and install os-prober and recreate grub.cfg to recognize my WinXP partition.
Hooray new packages in Debian!
2009-07-16
Benchmarking Intel's UXA vs EXA
There's been a lot of development with regard to Intel's new
UXA acceleration framework for its GMA integrated graphics chips.
Benchmarks over at Phoronix have shown mixed results, so I decided to
run some tests myself.
Tests run on an Asus Eee PC 900HA, with a 1.6GHz Atom N270 processor
and integrated GMA 950 graphics, gtkperf 0.40, default Debian kernel 2.6.30,
Xorg 1.6.2, and Intel driver 2.7.1. (i.e., an up to date unstable installation.)
- EXA (old-school)
- 100 runs: 15.75 seconds
- 200 runs: 34.79 seconds
- UXA (new-school)
- 100 runs: 22.10 seconds
- 200 runs: 48.54 seconds
2009-06-23
How to create a custom Debian packageI'm nowhere close to having the knowledge of a true Debian Developer, but I've used the OS enough to want to create my own packages. In this circumstance, I wanted a newer version of evilwm (it's 1.0.0 in the repo, and 1.0.1 is the newest release) and I wanted to change the mouse button behaviour. The steps I followed (I'm sure there's a cleaner way -- do inform me).
- apt-get install devscripts build-essential
- apt-get build-dep evilwm
- apt-get source evilwm
- Patch/hack away...
- debchange -n and document your non-maintainer changes
- debuild -us -uc so we don't try to sign it
- dpkg -i the resultant package
2009-06-22
Getting an Elantech touchpad working in Debian squeeze (or: how to disable tap-to-click on an Eee 900HA)Tap to click on a trackpad is a terrible idea. When I want to click, I'll hit the damn button myself, thank you very much. My ratio of unwanted to wanted tap-to-clicks is understandably undefined.
Three systems need to be configured for this to work: the kernel, the Xorg driver, and the X server itself.
- The kernel
As documented here, recent kernels don't need to be patched; they just need CONFIG_MOUSE_PS2_ELANTECH enabled. Sadly, because of other issues the maintainers know about, it won't be enabled in mainline Debian kernels anytime soon. So either you'll have to build a kernel yourself, or just take the psmouse.ko I've created from 2.6.30, and pop it in the apropriate location in /lib/modules. - The Xorg driver
Debian testing ("squeeze" at time of writing) has an old version of xserver-xorg-input-synaptics that doesnt have the necessary Elantech patches. Unstable does, but pinning the binary has other dependencies that would pretty much require upgrading all of X, which I'd rather not do. So you can either pin the source file and build it yourself, or download and install the package I've made. Grab it here. - The X server
We just need to poke aorund xorg.conf a bit. What worked for me:Section "InputDevice" Identifier "Configured Mouse" Option "CorePointer" Driver "synaptics" Option "Device" "/dev/input/event10" Option "Protocol" "auto-dev" Option "SHMConfig" "true" Option "MaxTapTime" "0" Option "VertTwoFingerScroll" "1" Option "HorizTwoFingerScroll" "1" EndSection
Great news: almost everything works out of the box. I was concerned about hardware support, and struggling with wireless, so I just apt-pinned the latest kernel from unstable, and it works perfectly.
- X11 at 1024x600, DRI
- Sound
- Ethernet
- Touchpad w/ two-finger scrolling (although with annoying-as-hell tap to click -- more on that later)
- Wireless
- Camera (w/ Skype)
- Suspend to RAM
I'm using evilwm as my window manager, because I love how it gets out of my way and lets me do my work. I'd post a screenshot, but there's no eye-candy to show off... =) I've also had to hack Firefox into shape so it doesn't take up silly amounts of vertical pixels.
2009-06-18
How to Install Debian on an Eee PC 900HAI just picked up an Asus Eee PC 900HA. It, currently, has the best mix of size, cost, and capabilities for what I want in a netbook. I'm keeping Windows on it to use Ableton Live and for "just in case" purposes. Here's documentation of what I've done to re-partition, keeping the provided Windows installation, and install Debian testing.
- Download and repartition using a GParted bootable USB drive. I used the Windows-based choice 3.
- Make sure to set the USB disk as higher priority than the internal drive, or else it'll boot from the HD every time.
- My drive came partitioned into four partitions:
- Windows boot (~80 GB)
- Windows free (empty, ~60 GB)
- Windows restore partition (~8 GB)
- Extra restore info? (~40 MB)
- Follow the instructions on this page of the Debian installation manual.
2009-06-17
Does Ableton Live work on an Eee PC 900HA?
Very much so. With two decks, equalizers, and a few other affects,
CPU usage doesn't appear to go higher than ~20% or so.
This may just become my new gig rig!
Just make sure to install
QuickTime
if MP3s are at all part of your setup. Cheers.
Done on a standard Debian installation with a sane toolchain installed.
- Download and untar libgmp, configure with ./configure --enable-cxx, and install.
- Download, untar, patch (according to their website), configure, and install libmpfr.
- You know the drill by now: ppl.
- apt-get install automake1.7 (for cloog-ppl)
- Who said we were anywhere close to done? cloog-ppl. Its configure script is really picky, though; I had to explicitly use --with-gmp=dir and --with-ppl=dir.
- Grab gcc-4.4.0, untar, and configure. These are the options I used (following Debian's gcc -v lead): $ ../gcc-4.4.0/configure --enable-languages=c,c++,fortran --prefix=/home/timdoug/local/ --enable-shared --with-system-zlib --without-included-gettext --enable-threads=posix --with-gmp=/home/timdoug/local/ --with-mpfr=/home/timdoug/local/ --enable-mpfr --with-ppl=/home/timdoug/local/ --with-cloog=/home/timdoug/local/ (note the different object directory!)
- The configure script should spit out something like this, amongst its output:
checking for correct version of gmp.h... yes
checking for correct version of mpfr.h... yes
checking for version 0.10 of PPL... yes
checking for correct version of CLooG... yes
- make, and grab a sandwich.
- Curse profusely when it doesn't compile.
2009-06-06
Installing Debian on a PlayStation 3 and running a Cell/SPU "Hello World"What could be better than flexing a bit of matrix-multiply muscle? We're going to use Daniel Hackenberg's hand-coded asm routines, because they achieve ridiculous performance.
- Follow these instructions.
- Install some packages: apt-get install build-essential rpm libc6-dev-ppc64 gcc-4.3-spu spu-tools
- Grab the following RPMs off of CellSDK-Devel-Fedora_3.0.0.1.0.iso.
- ps3:/# rpm2cpio /home/timdoug/libs/cell-libs-3.0-16.ppc.rpm | cpio -id
- ps3:/# rpm2cpio /home/timdoug/libs/cell-libs-3.0-16.ppc64.rpm | cpio -id
- ps3:/# rpm2cpio /home/timdoug/libs/cell-libs-devel-3.0-16.ppc.rpm | cpio -id
- ps3:/# rpm2cpio /home/timdoug/libs/cell-libs-devel-3.0-16.ppc64.rpm | cpio -id
- Debian ships with a 32 bit libspe2, but we need a 64 bit version:
- wget http://ftp.debian.org/debian/pool/main/libs/libspe2/libspe2_2.2.80-95.orig.tar.gz
- Add -m64 to CFLAGS in make.defines.
- make
- Add spufs /spu spufs defaults 0 0 to /etc/fstab.
- mkdir /spe && mount /spe
- wget "http://www.tu-dresden.de/hpcadm/dcount/dcount.php?package=matmul&get=matmul.tar.gz"
- Untar matmu.tar.gz and patch along these lines:
diff -urN matmul-old/COMPILE.sh matmul/COMPILE.sh --- matmul-old/COMPILE.sh 2008-02-29 06:30:08.000000000 -0500 +++ matmul/COMPILE.sh 2009-06-06 17:12:39.000000000 -0400 @@ -29,15 +29,15 @@ ${CELL_BIN}/spu-gcc -o matmul_spu matmul_spu.o matmul_spu_simd.o # embedd SPE object file into PPE object -echo "${CELL_BIN}/ppu-embedspu -m64 matmul_spu matmul_spu matmul_spu-embed64.o" -${CELL_BIN}/ppu-embedspu -m64 matmul_spu matmul_spu matmul_spu-embed64.o +echo "${CELL_BIN}/embedspu -m64 matmul_spu matmul_spu matmul_spu-embed64.o" +${CELL_BIN}/embedspu -m64 matmul_spu matmul_spu matmul_spu-embed64.o # compile PPE code -echo "${CELL_BIN}/ppu-gcc -W -Wall -O3 ${INC_PPU} -c matmul_ppu.c" -${CELL_BIN}/ppu-gcc -W -Wall -O3 ${INC_PPU} -c matmul_ppu.c +echo "${CELL_BIN}/gcc -m64 -W -Wall -O3 ${INC_PPU} -c matmul_ppu.c" +${CELL_BIN}/gcc -m64 -W -Wall -O3 ${INC_PPU} -c matmul_ppu.c # link SPE and PPE object files together -echo "${CELL_BIN}/ppu-gcc -o matmul matmul_ppu.o matmul_spu-embed64.o -lspe2" -${CELL_BIN}/ppu-gcc -o matmul matmul_ppu.o matmul_spu-embed64.o -lspe2 +echo "${CELL_BIN}/gcc -m64 -o matmul matmul_ppu.o matmul_spu-embed64.o -lspe2 -lpthread -L/home/timdoug/libspe2-2.2.80-95" +${CELL_BIN}/gcc -m64 -o matmul matmul_ppu.o matmul_spu-embed64.o -lspe2 -lpthread -L/home/timdoug/libspe2-2.2.80-95 rm -f matmul_spu *.o - Open up spu-top in another terminal to check up on things.
- ./matmul -s 6 -m 3072
timdoug@ps3:~/matmul$ ./matmul -s 6 -m 3072

Fast matrix multiplications on Cell (SMP) systems.
Copyright (C) 2007  Daniel Hackenberg, ZIH, TU-Dresden

Running matrix multiplication of 3072x3072 matrices using 6 SPEs...
Initializing arrays with random numbers... done!
Starting SPE calculations...
Done!

Performance results:
Performance of SPE  0: 25.35 GFLOPS
Performance of SPE  1: 25.35 GFLOPS
Performance of SPE  2: 25.36 GFLOPS
Performance of SPE  3: 25.36 GFLOPS
Performance of SPE  4: 25.36 GFLOPS
Performance of SPE  5: 25.36 GFLOPS
Aggregated performance for all 6 SPEs: 152.14 GFLOPS.

PPE-measured performance of matrix multiplication using 6 SPEs: 152.11 GFLOPS.
(of 153.60 GFLOPS theoretical peak at 3200 MHz clock frequency)
152 SP GFLOPS is crazy absurd for $400. The above taks ~7.5 seconds to run, but most of the time is in initializing the matrix with random values!
2009-06-03
Help! I'm running out of stack space!Edit /etc/security/limits.conf, open up a new shell, and have fun with ulimit.
Fun summer projectsSo. With a summer ahead of me, there are a few things I want to get into now that I have the time. A list:
- Get and play with an Arduino/Atmel AVR
- Create a much less crufty compiler with PLY (python lex-yacc) and maybe LLVM too (llvm-py maybe?)
- Follow the Jonesforth tutoral, and get better at x86 asm at the same time
- PS3/CUDA/SIMD fun & benchmarks
- Finally release that mixtape I've been working on
- Brush up on my Starcraft abilities
- Learn Erlang, Haskell, and read through SICP again
Code like this:
",".join(nodes_list[:num_nodes])
Objects, strings (finally sane in 3.0), lists, list slices...
2009-06-02
Reseting the root passwd on a PS3 Debian installationI conveniently forgot the password for my year-old PS3 installation, but conveniently recognized that kboot is a little Linux installation in and of itself. Hence, mounting /dev/ps3da1, chrooting into it, and running passwd does the trick.
2009-06-01
How to install rsh on DebianDebian is aptly (hah!) fickle with regard to rsh -- by default, if you have OpenSSH installed, rsh is just a symlink to it. For my research I need rsh in order to get around the overhead that ssh incurs; security isn't an issue because the machines are on a private network anyway.
- apt-get install rsh-redone-client rsh-redone-server
- Add appropriate hostnames to ~/.rhosts
- Edit /etc/hosts.deny and add in.rshd in.rlogind: ALL
- Edit /etc/hosts.allow and add in.rshd in.rlogind: [hostnames] as necessary.
I purchased a PS3 last summer with the express intent of running some simulations and benchmarks (and playing Gran Turismo 5 Prologue), but never got around to it (the first part, that is).
A few interesting links and PDFs:
- Implementation of the Mixed-Precision High Performance LINPACK Benchmark on the CELL Processor (what doesn't Dongarra do?)
- A Rough Guide to Scientific Computing On the PlayStation 3
- MIT's 6.819 lectures
GFLOPs are fun. Here's how to determine your cluster's performance.
- (make sure you have a proper build system: gcc, make, etc. Debian: apt-get install build-essential)
- Install OpenMPI and gfortran. On Debian, it's as simple as apt-get install gfortran libopenmpi-dev openmpi-bin.
- Download and compile GotoBLAS. It's generally lauded as the fastest BLAS for (at least) x86 machines. Compilation is a simple ./quickbuild.64bit (or 32, as appropriate) in the root directory of the tarball.
- Download and untar HPL. I used 1.0a -- 2.0 wouldn't compile for me.
- Create a Make.[arch] in the root dir of the hpl folder, and configure accordingly.
Appripriate example diff against setup/Make.Linux_PII_CBLAS:
--- setup/Make.Linux_PII_CBLAS	2004-01-22 00:13:11.000000000 -0500
+++ Make.timdoug	2009-06-01 00:23:29.000000000 -0400
@@ -61,7 +61,7 @@
 # - Platform identifier ------------------------------------------------
 # ----------------------------------------------------------------------
 #
-ARCH         = Linux_PII_CBLAS
+ARCH         = timdoug
 #
 # ----------------------------------------------------------------------
 # - HPL Directory Structure / HPL library ------------------------------
@@ -81,9 +81,9 @@
 # header files,  MPlib  is defined  to be the name of  the library to be
 # used. The variable MPdir is only used for defining MPinc and MPlib.
 #
-MPdir        = /usr/local/mpi
-MPinc        = -I$(MPdir)/include
-MPlib        = $(MPdir)/lib/libmpich.a
+MPdir        = /usr
+MPinc        = -I$(MPdir)/include/mpi
+MPlib        = -lmpi
 #
 # ----------------------------------------------------------------------
 # - Linear Algebra library (BLAS or VSIPL) -----------------------------
@@ -92,9 +92,9 @@
 # header files,  LAlib  is defined  to be the name of  the library to be
 # used. The variable LAdir is only used for defining LAinc and LAlib.
 #
-LAdir        = $(HOME)/netlib/ARCHIVES/Linux_PII
+LAdir        =
 LAinc        =
-LAlib        = $(LAdir)/libcblas.a $(LAdir)/libatlas.a
+LAlib        = ~/GotoBLAS/libgoto.a
 #
 # ----------------------------------------------------------------------
 # - F77 / C interface --------------------------------------------------
@@ -156,7 +156,7 @@
 #    *) call the BLAS Fortran 77 interface,
 #    *) not display detailed timing information.
 #
-HPL_OPTS     = -DHPL_CALL_CBLAS
+HPL_OPTS     =
 #
 # ----------------------------------------------------------------------
 #
@@ -173,7 +173,7 @@
 # On some platforms,  it is necessary  to use the Fortran linker to find
 # the Fortran internals used in the BLAS library.
 #
-LINKER       = /usr/bin/g77
+LINKER       = /usr/bin/gcc
 LINKFLAGS    = $(CCFLAGS)
 #
 ARCHIVER     = ar
- In hpl/bin/[arch], tweak HPL.dat. Example file:
HPLinpack benchmark input file
Innovative Computing Laboratory, University of Tennessee
HPL.out      output file name (if any)
6            device out (6=stdout,7=stderr,file)
1            # of problems sizes (N)
16384        Ns
1            # of NBs
128          NBs
0            PMAP process mapping (0=Row-,1=Column-major)
1            # of process grids (P x Q)
1            Ps
2            Qs
16.0         threshold
1            # of panel fact
2            PFACTs (0=left, 1=Crout, 2=Right)
1            # of recursive stopping criterium
4            NBMINs (>= 1)
1            # of panels in recursion
2            NDIVs
1            # of recursive panel fact.
2            RFACTs (0=left, 1=Crout, 2=Right)
1            # of broadcast
1            BCASTs (0=1rg,1=1rM,2=2rg,3=2rM,4=Lng,5=LnM)
1            # of lookahead depth
0            DEPTHs (>=0)
0            SWAP (0=bin-exch,1=long,2=mix)
64           swapping threshold
0            L1 in (0=transposed,1=no-transposed) form
0            U  in (0=transposed,1=no-transposed) form
1            Equilibration (0=no,1=yes)
8            memory alignment in double (> 0)
This is appropriate for a dual-core, 4GB RAM system. Important values to change:- N -- problem size. Start at ~1000 and ramp up until you hit the limit of your RAM. Note: it's quadratic (dimension of the matrices).
- NB -- block size. 128 works well for me. Others suggest 80, 160, or 256. Experiment.
- P and Q -- these multiplied should be the number of cores in your cluster. Certain configurations work better than others; do test.
- Run GOTO_NUM_THREADS=1 mpiexec -np [num processes] ./xhpl
domU:~/hpl/bin/timdoug# GOTO_NUM_THREADS=1 mpiexec -np 8 ./xhpl
============================================================================
HPLinpack 1.0a  --  High-Performance Linpack benchmark  --   January 20, 2004
Written by A. Petitet and R. Clint Whaley,  Innovative Computing Labs.,  UTK
============================================================================
[[[snip]]]
============================================================================
T/V                N    NB     P     Q               Time             Gflops
----------------------------------------------------------------------------
WR01L2C4       20000   128     2     4             105.33          5.064e+01
----------------------------------------------------------------------------
||Ax-b||_oo / ( eps * ||A||_1  * N        ) =        0.0067492 ...... PASSED
||Ax-b||_oo / ( eps * ||A||_1  * ||x||_1  ) =        0.0065323 ...... PASSED
||Ax-b||_oo / ( eps * ||A||_oo * ||x||_oo ) =        0.0012449 ...... PASSED
Hooray!